Search This Blog

Sunday, March 25, 2012

Happy Days Are Here Again!

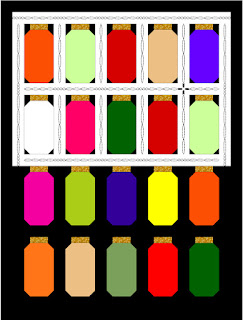
All twenty bottles are now quilted.  Hooray, hooray!  The hardest part of this quilt is complete.  In the end, the last 4 bottles weren't as difficult as I thought.  Always a nice surprise!
The biggest challenge was selecting a thread color to blend well
with the various colors.
Funny, the thread I bought for the watermelon looked just right at the store, but all wrong at home.  Turned out the peach thread was a better match.  I wish quilt shops would make an effort to provide good lighting over the thread rack, and/or place it near a window with natural light. 
Now I'm toying with the borders.  FMQ leaves perhaps?
Curvy lines?
Zig zags?

I wish EQ6 did a better job of superimposing the stencils.  My intention is to make the borders equal in size and shape in both directions to get a clean intersection.  I haven't figured out how to make it look like that in EQ6 though.  Maybe I need to upgrade?

A fourth option is to use a double needle and stitch a straight line down the center of each border and sash.  I may go that route in the interest of time.   Or - a single line, using a decorative stitch.

I need to get this in the mail by about April 10, and no quilting will get done next weekend.  So the simpler the better....

When I need a reprieve from this task, I've been designing barn quilt blocks and submitting them here:


Dug out the sketch book I'd used back in college to design some blocks that never got made.  I'm trying to recreate some of these in EQ6 for the contest.  Its been a great way to better learn to use the program.  I even recreated some applique blocks.

Both the Bottle Quilt and the Barn Quilt Contest have an early April deadline, so there's no time to waste!  :)

Tuesday, March 20, 2012

Creativity

I've been thinking about creativity a LOT lately.  I want to enter the Barn Quilt contest, and vacillate between too many ideas or not enough.  I've generated 46 variations of one Log Cabin quilt block - and I have two more themes I want to explore.  But which variations to enter and which to toss aside?

I kinda know how creativity works for me - but what of the broader picture?  Why does it elude us to the point of being maddening  - and then (often unpredictably) provide a rush of competing ideas?

Many of us wonder about it, but one person has gone so far as to write a book about it.

Here's  how NPR describes the book:

http://www.npr.org/2012/03/19/148777350/how-creativity-works-its-all-in-your-imagination?sc=fb&cc=fp

I'm certainly intrigued!  I hope to read this book in the near future and to share insights gained.  If you're familiar with it, I'd love your feedback.

Have a creative day!  :)

Monday, March 19, 2012

Bottle Quilt Burnout

As with every large project, there comes a time when my enthusiasm for the project wanes - and I'm nowhere near done.  I always manage to overcome this love-turned-to-hate phase and end up with a project I'm happy with.  But right this very minute I don't want to see another bottle for a long, long time!!!

This quilt was easy and fun to piece.  But thanks to my decision to improve my FMQ skills by outlining the fruits and veggies - it's been a devil to quilt.  16 of 20 bottles are done.  Just gotta keep on pluggin' away.   

I'm debating if I need to ditch stitch the outline of each bottle and lid.  Each one would have 11 turns, so for 20 bottles, that would be 220 turns.  Don't know if I have the patience to do that...hopefully I have quilted them well enough that it won't be necessary.  :)

Sunday, March 18, 2012

Red-Bellied Woodpecker


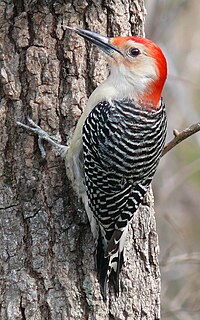
Dear Mr. Red-Bellied Woodpecker,
Thank you for visiting my yard.  I'm happy you like my old tree.  I hope you will make it your home.  I enjoy hearing your calls and drumming.  You're so very handsome - could you please sit still long enough for me to get a good look at you?

Thank you very much,
Chris

Friday, March 16, 2012

How to Erase a Line???


Do you EQ? 

I sure hope so, because I've never figured out how to erase a line when I'm designing a block.  If it's the last line I've drawn, of course I can undo.  But what if its another line? 

It's making me crazy!  Can you help?          


Thank you!  :)

More Golf Goodies

My search for golf goodies is finally complete.  With the help of friends and coworkers I've collected: LOTSA golf balls, a golf origami bag, a golf game, a calendar of amazing-but-true golf facts, a golf stress ball, golf mints, camouflage golf balls, the Smasher - a golf ball that looks like it smashed into your windshield, and napkins that match the ribbon on the centerpieces I make a week or two ago. 
I was fortunate to find many of these things at clearance prices.  FYI - In honor of Crafting Month, Joann's has all silk flowers at 50% off.  I had to get out of the store before I spent any more money - but if you're looking for savings check it out!  :)

Monday, March 12, 2012

GF Bread - 15 Months Later

Gluten free bread baking is a funny thing.  Literally.
At least its funny if you don't have high expectations.  I've shared some successes in the past, but now its time to come clean about the failures.  Maybe someone else can learn from my (many, many) mistakes.

1.  DO NOT use a dough hook - My very first experience with making GF bread involved a dough hook, as I'd always done with regular bread.  The recipe didn't call for a dough hook.  I assumed I needed it.  What a disaster.  The bread had a tunnel of gooey raw dough in the center.  Looked in my standard cook books for problem solving advice.  Diagnosis:  Insufficient gluten development!  Ya think? LOL Take note, use the same mixer attachment you would use for mixing a cake. 

2.  The Incredible Shrinking Loaf - The tendency of GF bread to deflate after baking is by far the most frustrating thing.  And look at the crust on that slice of bread - way too thick and dark - but I had to (oven) bake it that way to make sure it was fully cooked to a proper internal temperature (GF bread contains eggs).

I did a lot of bread baking with about a 50% success rate in the early days.  The winter of 10/11 was harsh, so I didn't mind taking time to experiment.  But come spring and summer I went to buying bread because I wanted to spend more time outside.  Come fall, I kept buying it because I didn't want to deal with the double rising and unreliable results.  But there is a trade-off.  I evenutally grew tired of paying $7.30 for a 1 lb. loaf.

In December 2011, Santa brought me my Cuisinart bread machine with a GF setting.  Things have improved greatly since then.  No need to babysit the dough through double risings.  I put the ingredients in the machine and just walk away.  A few hours later I have fresh, hot bread.  Loaves are uniform in size and shape with no shrinking.  Still, I've learned a few things... 

3.  Take the temperature of the warm water or milk.  Don't exceed 105 degrees.  If you do, the yeast will go crazy and your dough will rise right up and over the pan and start burning on the heating element.  Your smoke detector will go off.  Your dog won't like it.  Neither will you.

4.  READ the entire set of instructions before baking a loaf.  One brand (Pamela's) explicitly instructs you NOT to use the GF setting.  I, of course, learned this hard way and ended up with a short, gummy loaf. 

5.  Using buttermilk sounds nice, and gives a better texture, but it changes the flavor.  I recently made my favorite mix using buttermilk (in place of sweet milk or water) and wound up dissappointed.  I learned I like buttermilk in pancakes, not in bread.  If you are looking for a tangy, sourdough-type flavor - buttermilk will do the trick.

6.  Sometimes mistakes are a good thing.  The above mistake made me realize what was wrong about my favorite scratch recipe.  I'd been using buttermilk.  Tried it again - with regular milk, and it tasted great.

7.  Thou shalt not forget the mixing paddle!  This was one of the rare times I left the house while the bread maker was running.  The unmixed ingredients had started to bake by the time I returned.  I dumped the whole mess into the trash, and then thought I must have dumped the mixing paddle too - because it wasn't in the pan.  After thoroughly digging through all the trash and NOT finding it, I discovered it was clean and dry, sitting next to the dish strainer.  Doh!

SO, if you manage to avoid all of the above mistakes, here is what you can expect from my two favorite mixes:

A BIG improvement from the first two pictures, huh? 
And with less time involved.
But if you DO make one of my many mistakes, take heart.  Cosmetic defects often taste just fine, and if you can't use an odd shaped slice for a sandwich or toast, use it for bread cubes.  Just freeze them until you have enough for bread pudding or croutons.  And when you're done slicing save the bread crumbs too.  You wouldn't believe what they charge for these two GF items at the grocery store!

For a comparison of cost, flavor and quality of various mixes and frozen breads, see: http://quilt-talk.blogspot.com/2011/02/my-definition-of-successful-gluten-free.html

For my favorite bread mix (oven baked) and technique see:
http://quilt-talk.blogspot.com/2011/08/chriss-favorite-gf-bread.html

For my favorite GF scratch baking cook book see:
http://quilt-talk.blogspot.com/2011/01/good-gluten-free-cook-book.html

Happy GF baking! :)


Sunday, March 11, 2012

Crafters Breakfast March 2012

Had a lovely Crafters' Breakfast at Judy's house. 
Judy set a beautiful table. Rather than using placemats, each place setting was on two hot pads - all of which were hand pieced and hand quilted by an elderly woman in our group. Its amazing that she continues to quilt despite limited eye sight. 
She does nice work!
I'd never been to to Judy's place before,
but felt right at home when greeted by this bird quilt in the entry way.  
Also in the entry way were...
...an apple quilt, a welcome quilt, and...
...these beautiful ginko leaves. 
Like the hot pads, this pillow is hand pieced and quilted.
After we cleared the table, I got a nice shot of Mr. Rabbit.  He added a festive touch to the table, and put us in the mood for Spring.
This wool blanket hangs at the staircase landing.  Such beautiful blues!
In Judy's kitchen I spotted my own creation - the Audacious Autumn quilt.  But I can see the quilt is too heavy for the light dowel rod I used.  Next time we meet I'm going to put a sleeve on the bottom to even the lower edge, and insert a sturdier rod on top.
I learned why Judy liked this quilt so much.  Her husband is color blind - but he can see RED very well.  This quilt was a gift to him.
Here more red spices up the area above the stove. 
Judy's flowers were lovely.  Here is a clivia in bloom.  She also had beautiful blooming pointsettias - well into March.  I was certainly impressed - mine never see the end of January!  

Thank you Judy for your a lovely meal and visit. :)

Quilting Fruits & Veggies

 It took a little while, but inspiration finally struck. 
I felt an all-over pattern would detract from the various foods, so I opted to enhance them by quiliting around each piece of fruit.  I don't have a lot of experience with FMQ but am pushing myself to do more.  This technique will save some time because I don't have to mark the quilt.  :)

Saturday, March 10, 2012

OK! Now What?

The quilt is basted, but I'm still stumped about how to quilt it.  I don't have a long arm, so it has to be something manageable on a home sewing machine. 
Here's an idea I've been toying with.  I would soften the curves on the bottle, but the lid would have to be a neat, clean rectangle.  I'd have to make a template and mark the quilt so the bottles would be a) recognizable, and b) uniform in size and shape.  I suppose I could do it as an all over pattern or in rows.  A swirling pattern would be a nice contrast to the neat orderly rows in the quilt itself.  And what thread color to use?
Better consult "Quilting Makes the Quilt" one more time!  :)

Friday, March 9, 2012

Bottle Quilt Backing

Chose this fabric to back my Bottle Quilt.  Bought a little extra in case it makes a good binding.  (Its hard to know when you're at the store, and the quilt is home.)  The backing is line-drying now.  Tomorrow I baste!
While looking for backing, I discovered these whimsical farm animals.  Bought enough to make 20 hot pads.  After last fall's experience with chicken pot holders, I expect these will be hot sellers!  :)

Wednesday, March 7, 2012

Bottle Quilt Binding Fabric

After numerous unsuccessful auditions, I've settled on this apple fabric for my binding. Red and green are the most common colors in this quilt, yet neither looked right all by itself.  This fabric will be a nice balance.  Now to get it quilted! :)


Golf Centerpiece Tutorial

A long-time coworker is retiring.  He and his wife are avid golfers, so his send-off will be centered around that theme.   We have no party budget, so I decided to make centerpieces using mostly things I have on hand.  The only thing I purchased was the ribbon.  To make these you'll need:

10 - 4" clay pots
6 - Floral styrofoam "mug plugs"
A pencil
10 non-bendable plastic straws in the color of your choice
Cellophane or paper "grass"
10 golf balls
Graph paper, 1/4" squares
Glue stick
Hot glue gun
4 1/4 yards ribbon
Scissors
Confetti, if desired
First, I dismantled flower pots I had made for a wedding.  I don't glue my styrofoam into the pot, so I can lift one arrangement out put in another as needed.
Cut each "mug plug" into thirds.
Press one-third section firmly into pot.
Use a pencil to make a hole in the center of the styrofoam.
Hold styrofoam down while retracting pencil.
Insert plastic straw.  You could also use a colorful pencil, or dowel rod cut and painted to the size and color of your choice.
Add green grass and a golf ball.
Trim grass around edge of pot.
Print hole numbers on green printer paper.  Use a font that has all numbers uniform in size (some are not).  Numbers should be 3/8 to 1/2" in height. (If you read to the end of this tutorial, you'll see we later changed the flag numbering system.)  
To make the flags, two templates are needed.  The first is a 1.5" square, with a 2.5" long triangle off to the right.  Cut a viewing window as pictured.
The second template is a triangle of identical size, trimmed to take 1/8" off each of the long sides.  Cut a viewing window in this template also.
Use templates to line numbers up on the flags.  Rather than tracing the templates, use a sharp pencil to make a dot at each point, then connect points with a pencil and ruler.  Cut flag  pieces out by cutting just inside the pencil lines.
Flag cut outs should look like this.  Crease larger flag along one side of the 1.5" square.  Crease in both directions.  Crease will allow you to point the flag in whatever direction you choose.  The crease line will also serve as a guide later.
Apply glue stick to the back side of the smaller piece, taking care to get glue on all three points.  Apply to back side of larger flag piece.  Then apply glue stick to 1 1/2 " square on large flag.
Carefully wrap glued side around straw, wrapping until you reach the crease line.  Hold in place for about 10 seconds before letting go.
Reapeat until all flags are applied.
Warm up your hot glue gun.  While it's warming, cut 10 pieces of ribbon, 15" long.  I used 3/8" wide ribbon here, but 1/2" would also look nice. 
Apply glue to center third of ribbon and wrap from center front around toward the back.  Turn pot around.  Apply glue to one end of remaining ribbon and apply to pot.  Apply glue to second end of ribbon and apply so that ends line up neatly.  If the retiree were a woman, I may have added a small bow.  Since its for a man, I chose not to.
A friend suggested creating a 19th hole,
with the flag saying "Retirement" on the opposite side.
Each pot will be accompanied by "golf ball" confetti. 
The final touch will be a simple spring flower arrangement on the cake table.  The color of the flowers will coordinate with those on the cake.  :)